Mobile SDK: iOS v1
This page will show you how to install and use the FuturaeKit SDK for iOS.
Prerequisites
Before reading the rest of this guide, please make sure that you first read the Mobile SDK: Introduction page.
Release Information
You can find information about the iOS FuturaeKit SDK release history and changes here.
Installation
We are going to assume that you are using Xcode for your development. You can install FuturaeKit into your project using:
SwiftPM
As of Xcode 12.0 (and Swift Tools 5.3) it is possible to integrate FuturaeKit directly within Xcode.
To add FuturaeKit follow the usual way of adding a package dependency:
File -> Swift Packages -> Add Package Dependency
In the window that pops up simply enter: https://git.futurae.com/futurae-public/futurae-ios-sdk.git as the package repository URL.
The FuturaeKit framework should automatically be added to your project: you’re good to go!
To make sure that your application runs on a device, add the following “Run Script Phase” command to your App’s target build phases, to force deep sign the frameworks with your own signing identity:
find "${CODESIGNING_FOLDER_PATH}" -name '*.framework' -print0 | while read -d $'\0' framework
do
    codesign --force --deep --sign "${EXPANDED_CODE_SIGN_IDENTITY}" --preserve-metadata=identifier,entitlements --timestamp=none "${framework}"
done
Carthage
Carthage is a lightweight dependency manager for Swift and Objective-C. It leverages CocoaTouch modules and is less invasive than CocoaPods.
To install with Carthage, follow the instruction on Carthage. We support integration using Carthage binary frameworks. You can add FuturaeKit by adding the following line to your Cartfile
binary https://git.futurae.com/futurae-public/futurae-ios-sdk/-/raw/master/CarthageJson/FuturaeKit.json
Then run carthage bootstrap (or carthage update is you’re updating your SDKs).
On your application targets' “Build Phases” settings tab, click the “+” icon and choose “New Run Script Phase”. Create a Run Script in which you specify your shell (e.g., /bin/sh), add the following contents to the script area below the shell:
/usr/local/bin/carthage copy-frameworks
Add the paths to the framerworks you want to use under “Input Files”, e.g.:
$(SRCROOT)/Carthage/Build/iOS/FuturaeKit.framework
Manual Installation
You can download the latest SDK from the SDK repository, or clone the repository directly. The repository also contains a simple demo app to show how the SDK can be integrated.
Add SDK to Project
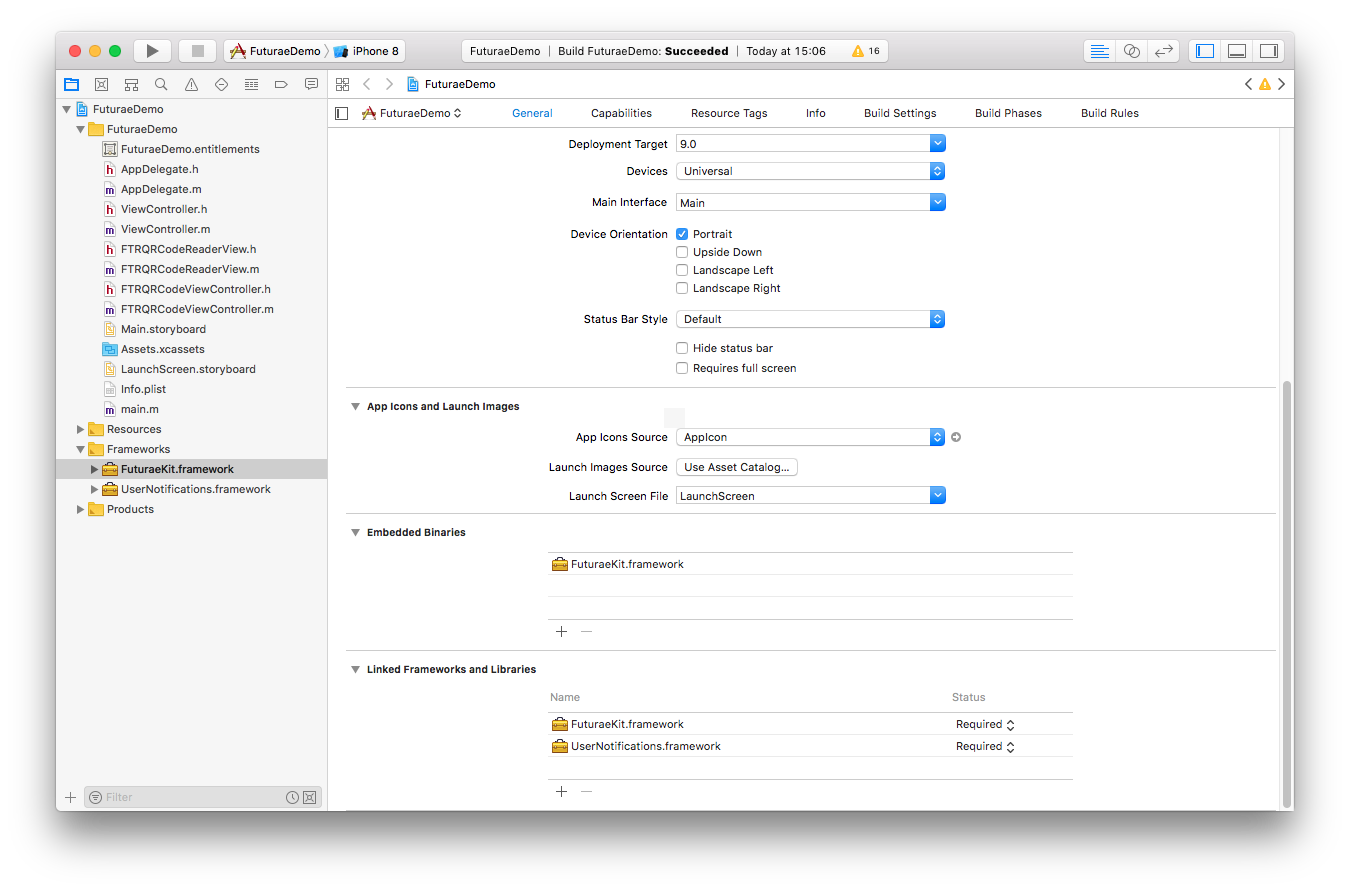
You can include the FuturaeKit SDK by adding the FuturaeKit.framework manually to your targets Embedded Binaries (in the General tab). Afterwards, drag the FuturaeKit.framework into the Frameworks group of your project.
Configuration and Initialization
FuturaeKit SDK is a dynamic framework, so you should use the following import statement:
#import <FuturaeKit/FuturaeKit.h>
Next, we’ll initialize the SDK.
In the Project Navigator, open the source file of your application delegate. Add the import statement at the top of the file, then add the following call to FuturaeKit in the didFinishLaunching or didFinishLaunchingWithOptions method of your app delegate:
#import <FuturaeKit/FuturaeKit.h>

// ...
FTRConfig *ftrConfig = [FTRConfig configWithSdkId:@"{FuturaeSdkId}" sdkKey:@"{FuturaeSdkKey}" baseUrl:@"https://api.futurae.com:443"];
[FTRClient launchWithConfig:ftrConfig];
Build and run your app. If it is successful, you should be able to see the SDK logs in the console.
Keychain Configuration
Keychain Sharing and Access Groups
By default the SDK stores its keychain items in the app’s default access group. This should be sufficient in most cases. Nevertheless, if your app is sharing access to keychain items with other apps then from a security point of view, the keychain items which belong to the Futurae SDK should not be shared, and thus they should be stored in an access group that is only accessible by the app that hosts the SDK. If the app’s default access group is shared with other apps, then another one should be used instead.
For this reason, the SDK provides the ability to specify the keychain access group to which the SDK-owned keychain items should be stored. The specified access group must not be shared with other apps.
#import <FuturaeKit/FuturaeKit.h>

// ...
FTRKeychainConfig *keychainConfig = [FTRKeychainConfig configWithAccessGroup:@"{teamID}.com.example.appPrivateGroup"];
FTRConfig *ftrConfig = [FTRConfig configWithSdkId:@"{FuturaeSdkId}"
                                           sdkKey:@"{FuturaeSdkKey}"
                                          baseUrl:@"https://api.futurae.com:443"
                                         keychain:keychainConfig];
[FTRClient launchWithConfig:ftrConfig];
When a keychain access group is specified, like in the example above, the SDK will automatically migrate all its keychain items to the specified access group, in the case that they are previously stored in a different access group. This ensures that if an already existing app, which was not originally configured to specify an access group when initializing the SDK), changes the behavior to specify an access group in a future release, then existing installations will have the Futurae SDK keys migrated to the specified access group after the relevant app update.
Note that if the SDK cannot store its items in the specified access group (for example, if the app doesn’t have the entitlement to do so) then it will raise an NSException.
Keychain Items Accessibility
By default the SDK stores its keychain items using the kSecAttrAccessibleAfterFirstUnlockThisDeviceOnly accessibility value.
You can choose a different accessibility value, depending on the use case and requirements of your application, using one of the available FTRKeychainItemAccessibility values (which map directly to the respective iOS accessibility values), when initializing the SDK. For example:
#import <FuturaeKit/FuturaeKit.h>

// ...
FTRKeychainConfig *keychainConfig = [FTRKeychainConfig configWithCryptoItemsAccessibility:FTRKeychainItemAccessibilityWhenUnlockedThisDeviceOnly];
FTRConfig *ftrConfig = [FTRConfig configWithSdkId:@"{FuturaeSdkId}"
                                           sdkKey:@"{FuturaeSdkKey}"
                                          baseUrl:@"https://api.futurae.com:443"
                                         keychain:keychainConfig];
[FTRClient launchWithConfig:ftrConfig];
Refer to the inline documentation of FTRKeychainConfig.h for further information on the available choices.
Demo App
The SDK’s repository contains a stripped-down demo app which showcases examples of how some of the SDK’s core features can be integrated.
Features
The FuturaeKit SDK for iOS provides the following features and functionality:
- Mobile SDK: iOS v1
Push Notifications
To enable push notifications add the following call in the didFinishLaunching or didFinishLaunchingWithOptions method of your app delegate:
// push notifications
if (floor(NSFoundationVersionNumber) > NSFoundationVersionNumber_iOS_9_x_Max) { // iOS 10+
  UNUserNotificationCenter *center = [UNUserNotificationCenter currentNotificationCenter];
  center.delegate = self;
  [center requestAuthorizationWithOptions:(UNAuthorizationOptionAlert | UNAuthorizationOptionSound | UNAuthorizationOptionBadge)
                              completionHandler:^(BOOL granted, NSError * _Nullable error) {
                                  // NOTE: To be completed
                              }];
} else { // iOS 8+ without UserNotifications Framework
  UIUserNotificationSettings *settings = [UIUserNotificationSettings settingsForTypes:(UIUserNotificationTypeBadge | UIUserNotificationTypeAlert | UIUserNotificationTypeSound) categories:nil];
  [[UIApplication sharedApplication] registerUserNotificationSettings:settings];
}

[[UIApplication sharedApplication] registerForRemoteNotifications];
To send the push notification token, add the following call in the didRegisterForRemoteNotificationsWithDeviceToken method of your app delegate:
- (void)application:(UIApplication *)app didRegisterForRemoteNotificationsWithDeviceToken:(NSData *)deviceToken {

    [[FTRClient sharedClient] registerPushToken:deviceToken];
}
To handle the Futurae push notifications, implement the FTRNotificationDelegate and add the following call in the respective method of your app delegate (didReceiveRemoteNotification:fetchCompletionHandler: or pushRegistry:didReceiveIncomingPushWithPayload:):
- (void)pushRegistry:(PKPushRegistry *)registry didUpdatePushCredentials:(PKPushCredentials *)credentials forType:(NSString *)type
{
    [[FTRClient sharedClient] handleNotification:payload delegate:self];
}
QR Codes
The Futurae Authentication Platform, uses QR Codes for different operations:
- Enroll a device for a user (online)
- Authenticate a user or transaction (online)
- Authenticate a user or transaction (offline)
The Futurae SDK supports all these functionalities. The business App can have different flows for supporting the needed functionality, or condense all QR Code operations in one. The Futurae SDK provides a handy method to identify on the fly which type of QR Code the user has scanned:
NSString *QRCodeString = ...
switch ([FTRClient QRCodeTypeFromQRCode:QRCodeString]) {
    case FTRQRCodeTypeEnrollment:
        // handle Enrollment
        break;
    case FTRQRCodeTypeOnlineAuth:
        // handle Online QR Code Authentication
        break;
    case FTRQRCodeTypeOfflineAuth:
        // handle Offline QR Code Authentication
        break;
    case FTRQRCodeTypeInvalid:
        // handle invalid QR Code
        break;
}
Enroll
To enroll this SDK as a device for a Futurae User, call the following method using a valid activation code, for example obtained by scanning an enrollment QR Code:
To enroll a user, you must call the following method, using a valid code:
[[FTRClient sharedClient] enroll:code callback:^(NSError *error) {

}];
You can either call directly the above method or use a QR-Code Reader UIViewController to scan a code:
FTRQRCodeViewController *qrcodeVC = [[FTRQRCodeViewController alloc] init];
qrcodeVC.delegate = self;
UINavigationController *navigationController = [[UINavigationController alloc] initWithRootViewController:qrcodeVC];
[self presentViewController:navigationController animated:YES completion:nil];
If a QR-Code is successfully scanned then the following delegate method with be called, with the scanned code:
- (void)reader:(FTRQRCodeViewController * _Nullable)reader didScanResult:(NSString *_Nullable)result
{
  ...
}
Please make sure to call enroll, inside the delegate method to complete the user enrollment:
[[FTRClient sharedClient] enroll:result callback:^(NSError *error) {

}];
Logout (Unenroll)
To remove an account from this SDK (ie unenroll this user device), use the following method:
[[FTRClient sharedClient] logoutForUser:userId callback:^(NSError *error) {

}];
Typically this should happen either when the user removes the account manually from the app, or when a user has been logged out remotely by the server. In the former case, calling the logout() method is enough, as it notifies the server of the logout and deletes the account from the SDK too.
Account Status
To get a list of all enrolled accounts in this SDK, call the following method:
NSArray *accounts = [[FTRClient sharedClient] getAccounts];
To fetch the status and pending authentication Authentication Session Information for these accounts, you can use the following method (where accounts is a list of the corresponding user IDs):
[[FTRClient sharedClient] getAccountsStatus:accounts
                                    success:^(id _Nullable data) {
                                        // Handle the pending sessions
                                    }
                                    failure:^(NSError * _Nullable error) {
                                        // Handle the error
                                    }];
Authenticate User
To authenticate (or reject) a user session, depending on the authentication factor, you can use the following methods:
One-Touch
With One-Touch (aka Approve), the server will send a push notification to the app, where the user should approve or reject the authentication session.
Get the user ID and session ID from the Push Notification handler. Once the outcome of the authentication has been decided (e.g., approved/rejected by the user), it should be sent to the server for the authentication session to complete, using one of the methods described in the subsections below.
Approve Authentication
To approve a user authentication:
[[FTRClient sharedClient] approveAuthWithUserId:userId
                                      sessionId:sessionId
                                       callback:^(NSError * _Nullable error) {

}];
To approve a user authentication when extraInfo field has a non-null value (refer to Authentication Session Information):
[[FTRClient sharedClient] approveAuthWithUserId:userId
                                      sessionId:sessionId
                                      extraInfo:extraInfo
                                       callback:^(NSError * _Nullable error) {

}];
Reject Authentication
To reject a user authentication, and optionally define it as fraud:
[[FTRClient sharedClient] rejectAuthWithUserId:userId sessionId:sessionId
                                                        isFraud:@(NO)
                                                       callback:^(NSError * _Nullable error) {

}];
To reject a user authentication when extraInfo field has a non-null value (refer to Authentication Session Information), and optionally define it as fraud:
[[FTRClient sharedClient] rejectAuthWithUserId:userId sessionId:sessionId
                                                        isFraud:@(NO)
                                                      extraInfo:extraInfo
                                                       callback:^(NSError * _Nullable error) {

}];
Online QR Code
To authenticate the user using online QR Code, scan the QR Code provided by the server and pass its contents to the following method:
[[FTRClient sharedClient] approveAuthWithQrCode:qrCodeScanResult
                                       callback:^(NSError * _Nullable error) {

}];
In case the backend API Authenticate with QR code (or Authenticate Transaction with QR code) is invoked with supplying the extra_info input parameter (for example, when contextual information for logins, or transaction details for transaction authentication), which includes information that must be displayed to the user before they can approve/reject the request, then you must retrieve this information from the Futurae backend and include it in the authentication response. See section Authentication Session Information for more information, and then use the following method:
[[FTRClient sharedClient] approveAuthWithQrCode:qrCodeScanResult
                                      extraInfo:extraInfo
                                       callback:^(NSError * _Nullable error) {

}];
Offline QR Code
The Offline QR Code Factor does not require any internet connection on the user’s phone, to function.
To authenticate with the offline QR Code Factor, scan the QR Code provided by the server and display the relevant information to the user. If the user approves the authentication or transaction request, generate the 6-digit confirmation number that the user needs to enter in the browser:
NSError *error = nil;
NSString *verificationCode = [FTRClient.sharedClient computeVerificationCodeFromQRCode:QRCodeString error:&error];

if (error == nil) {
  // Verification code generated successfully.
}
IMPORTANT: In case the backend API Authenticate with Offline QR code (or Authenticate Transaction with Offline QR code) is invoked with supplying the extra_info input parameter (for example, when contextual information for logins, or transaction details for transaction authentication), which includes information that must be displayed to the user before they can approve/reject the request, then you can retrieve this information from the QR code itself, as shown below:
NSArray<FTRExtraInfo *> *extraInformation = [FTRClient.sharedClient extraInfoFromOfflineQRCode:QRCodeString];
Authentication Session Information
For a given authentication session, either identified via a session ID (e.g. received by a push notification) or a session Token (e.g. received by a QRCode scan), you can ask the server for more information about the session:
// if you have a session ID
- (void)getSessionInfo:(NSString * _Nonnull)userId
             sessionId:(NSString * _Nonnull)sessionId
               success:(nullable FTRRequestDataHandler)success
               failure:(nullable FTRRequestHandler)failure;

// if you have a session Token
- (void)getSessionInfo:(NSString * _Nonnull)userId
          sessionToken:(NSString * _Nonnull)sessionToken
               success:(nullable FTRRequestDataHandler)success
               failure:(nullable FTRRequestHandler)failure;
If there is extra information to be displayed to the user (supplied when calling Authenticate User or Authenticate Transaction in the backend API), for example when confirming a transaction, this will be indicated with a list of key-value pairs in the extra_info part of the response.
TOTP
In order for the user to authenticate using the offline TOTP factor, you need to show the current TOTP to the user. You can get the later by calling:
FTRTotp *result = [[FTRClient sharedClient] nextTotpForUser:user_id];
The result object contains the current 6-digit TOTP and the remaining seconds (as NSString) that it will be valid for:
NSString *totp = result.totp;
NSString *remaining_secs = result.remaining_secs;
URI Schemes
The SDK is able to handle URI scheme calls, which can be used to either enroll or authenticate users. To handle the Futurae URI scheme calls, implement the FTROpenURLDelegate and add the following call in the openURL:sourceApplication:annotation: method of your app delegate:
- (BOOL)application:(UIApplication *)application openURL:(NSURL *)url sourceApplication:(NSString *)sourceApplication annotation:(id)annotation
{
		[[FTRClient sharedClient] openURL:url sourceApplication:sourceApplication annotation:annotation delegate:self];

		return YES;
}
IMPORTANT: In case you perform authentication using with a URI scheme call (using the mobile_auth_uri value which is returned by the Futurae backend when calling Authenticate User or Authenticate Transaction), and this authentication includes extra information to be displayed to the user, you must retrieve this information from the server and include it in the authentication response. See section Authentication Session Information for details on how to do that.
Automatic Account Recovery
Automatic account recovery (aka account migration) allows the user to migrate the Futurae account(s) currently enrolled in an existing Futurae iOS SDK installation to:
- the same or a different device when restoring the device via an iCloud or encrypted iTunes backup, or
- the same device after erasing and reinstalling the SDK-enabled mobile app.
This enables the user to recover their accounts on a new app installation automatically.
On the fresh app installation, the SDK is able to identify if account migration is possible and return the number of accounts which can be migrated. In order to do so, invoke the following method:
[FTRClient.sharedClient checkAccountMigrationPossibleSuccess:^(NSUInteger numberOfAccountsToMigrate) {
    // Account migration is possible - unsigned integer indicates the number of accounts to be migrated to this device
} failure:^(NSError * _Nonnull error) {
    // Checking for account migration eligibility failed
}];
To execute account migration invoke the following method. The migrated accounts (i.e., Futurae user ids) will be returned, if successful:
[FTRClient.sharedClient executeAccountMigrationSuccess:^(NSArray<FTRAccount *> * _Nonnull accountsMigrated) {
    // Account migration finished successfully - array of all Futurae user_ids which were migrated successfully
} failure:^(NSError * _Nonnull error) {
    // Account migration failed
}];
IMPORTANT: In order for account migration to be feasible on the new device, the following are required:
- If restoring a device from a backup, the migration data of the SDK in previous app installation must have been included in the backup of the device from which the current device is restored. Additionally, they iCloud Keychain must have been enabled in the previous device and must be enabled in the new device, as well.
- The SDK in the new app installation must have no other accounts currently or previously enrolled.
Errors Related to Automatic Account Recovery
There is a dedicated enum to distinguish errors that might occur during checking or executing account migration:
typedef NS_CLOSED_ENUM(NSUInteger, FTRAccountMigrationError) {
    FTRAccountMigrationErrorNoMigrationInfo = 900,
    FTRAccountMigrationErrorAccountsExistError = 901,
    FTRAccountMigrationErrorAccountPreviouslyEnrolledError = 902
};
If code in NSError object is different than the one above it means that a server error occurred. You can access the error’s userInfo dictionary for a more readable description of the error.
Public Key Pinning
In order to activate the Public Key Pinning mechanism of the Futurae iOS SDK so that it only accepts a specific list of public keys when connecting to the Futurae backend over TLS, you need to perform the following steps:
- Find the keys to be pinned, in a self-signed certificate format, here.
- Copy these certificates into the
Resourcesfolder of your app, as is the case for the example demo app in the repo above. The Futurae iOS SDK will pick them up from there and load them to enable the pinning mechanism for these specific keys.
Clear SDK Data
Futurae iOS SDK provides a convenient method to clear all SDK internal data:
#import <FuturaeKit/FuturaeKit.h>

[[FTRClient sharedClient] clearDataFromDB:YES fromKeychain:NO];
This method removes the following data:
- Internal DB (
fromDBmust be set toYES) - Internal SDK keychain material, including cryptographic keys and identifiers (
fromKeychainmust be set toYES)
Clearing the SDK data brings it to a fresh-start state. Hence, you can enroll new users and make use of it as per usual.