Authentication
This section describes how to authenticate users using the Auth API.
After a user has enrolled with a device, your application can perform Futurae authentication for that user, using any of the available factors, and depending on the capabilities of the user’s devices.
The following flowchart illustrates the basic steps for performing an authentication:
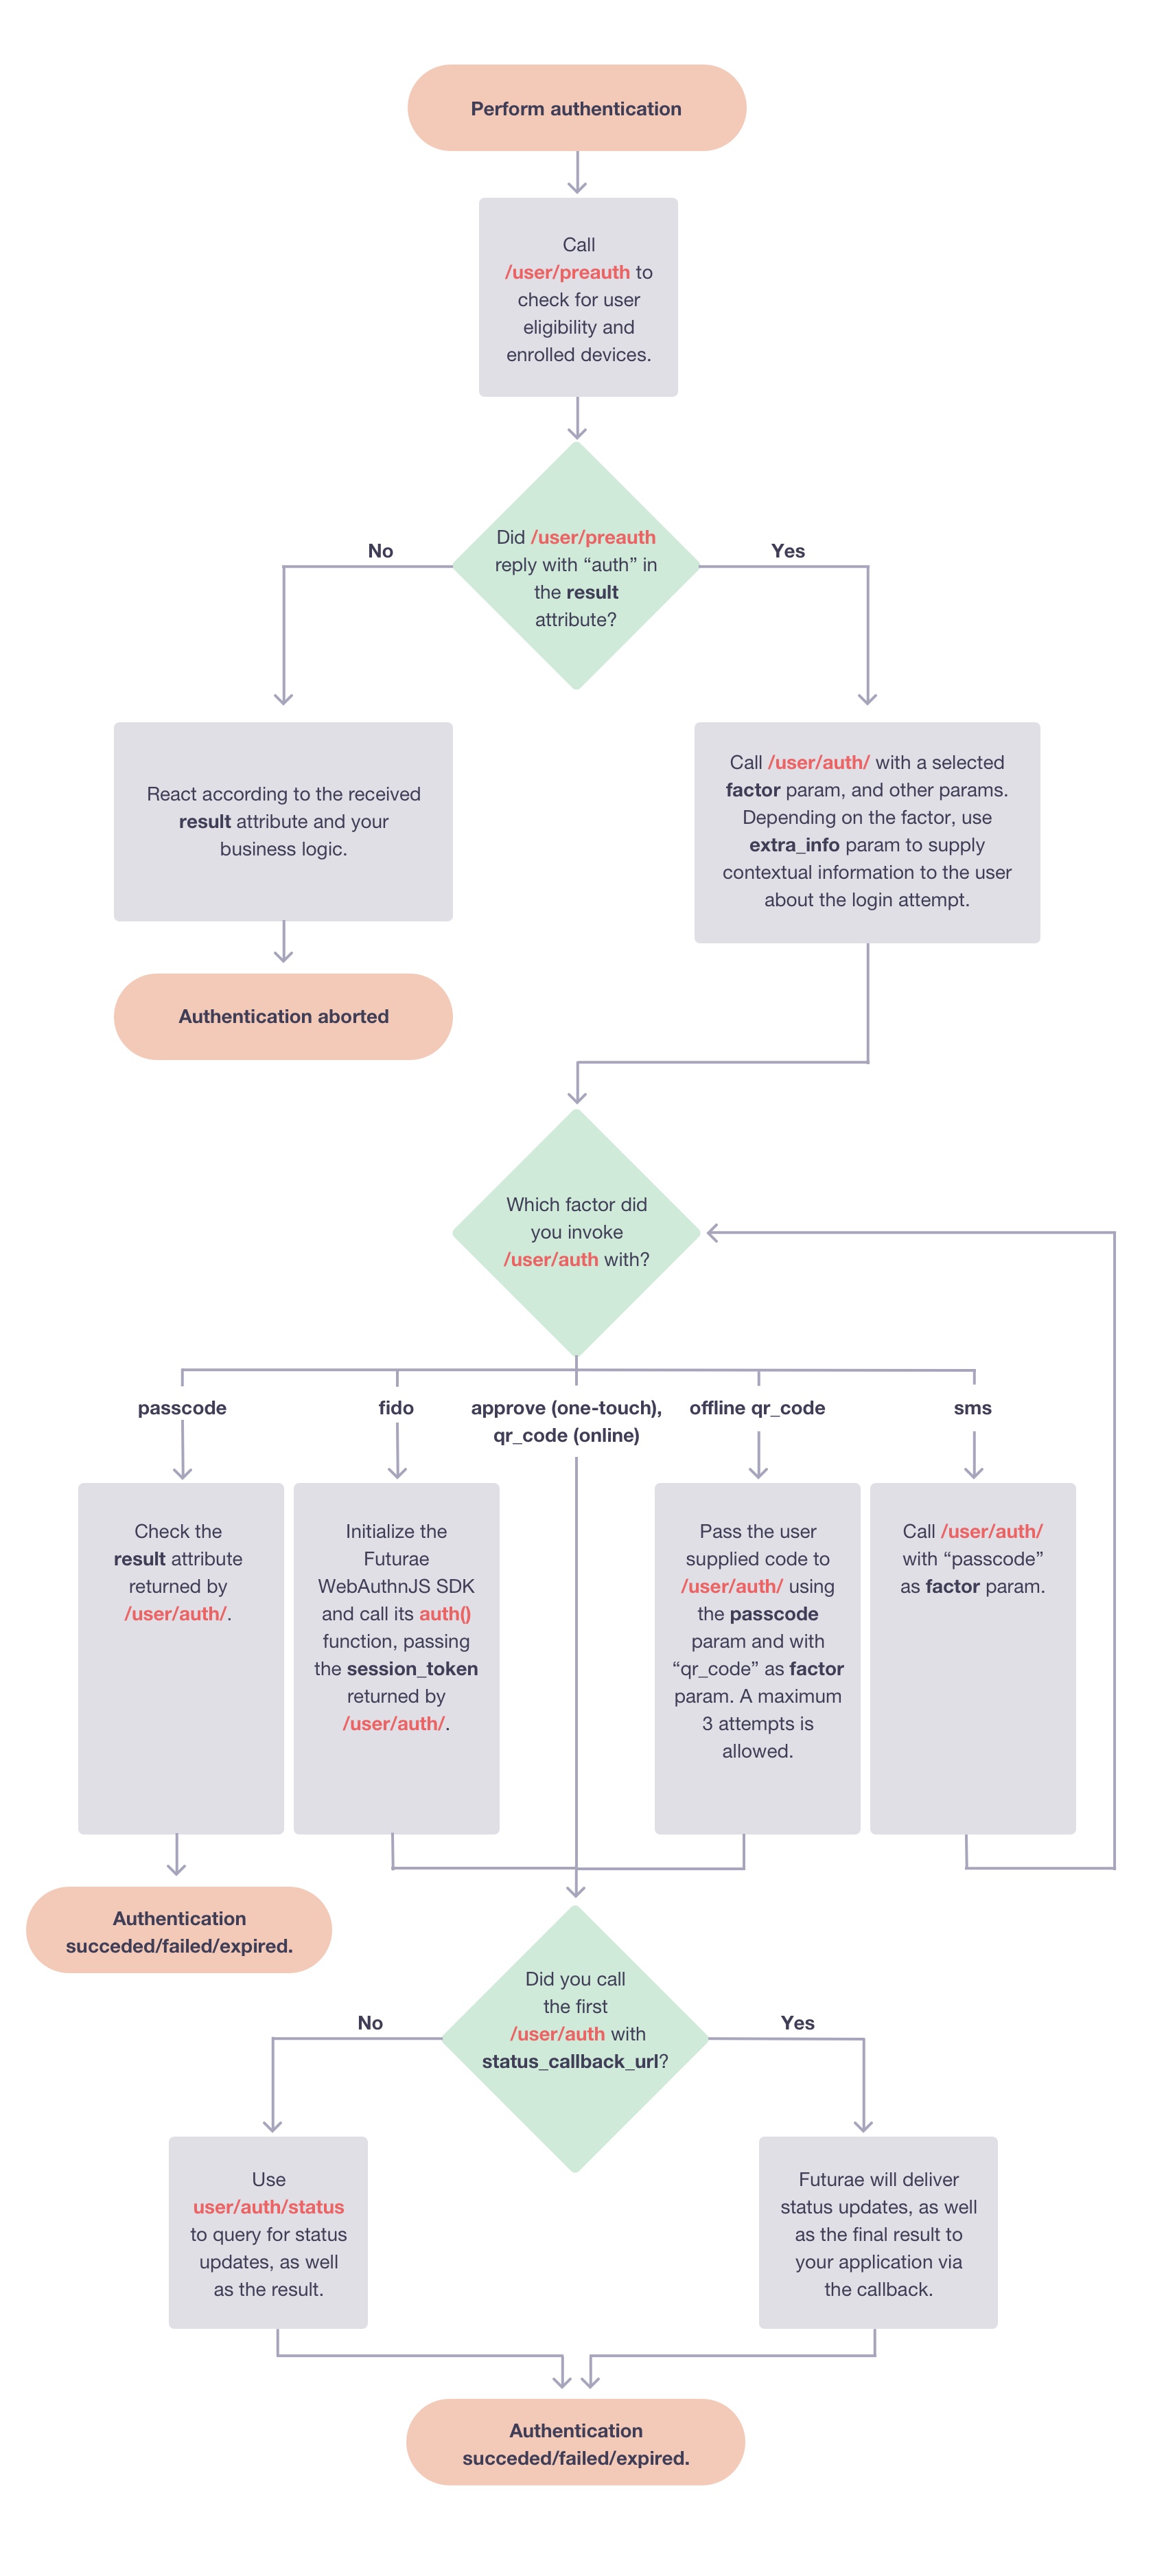
The details of the process depend on the selected factor, nevertheless for all factors the high-level procedure is the following:
Call /user/preauth to check if the user is eligible for Futurae authentication, as well as retrieve his enrolled devices and the capabilities of each device (the capabilities of a device determine which factors can be used with that device).
Call /user/auth to start the authentication process with a selected factor. For factors where it’s applicable, you may need to specify the user device (or “auto” to automatically use the most recently enrolled one). Also where applicable, use the
extra_infoparameter in order to supply information about the particular authentication attempt (e.g., the user’s approximate location, IP address and browser). This will appear on the user’s screen, along with the option to approve or reject the authentication attempt.For some factors /user/auth will return immediately, providing a
session_id. Your application can use thesession_idin order to query the status and eventually retrieve the result of this particular authentication attempt, via the /user/auth/status endpoint. For the “passcode” factor, /user/auth will return immediately, providing the result of the passcode verification. Finally for some other factors, there is an option to supply theasyncparameter, which when set to false, will cause the endpoint to run synchronously and return a response when the authentication process has completed. Also for some factors, you can supply a callback URL when invoking /user/auth. Futurae will call this URL with status updates and the result of the authentication attempt.
We stress again that there are some slight variations on this generic flow, depending on the particular authentication factor. Some particular use cases that are explained in more detail in subsequent sections below are:
Also, refer to the documentation of the /user/auth and /user/auth/status endpoints for further information on how to use these relevant endpoints.
Passwordless Authentication
Given the authentication technologies provided by Futurae it’s quite straightforward to implement passwordless authentication experience for your users. Passwordless authentication removes the password as the user’s first authentication factor. Instead it only leverages Futurae authentication (such as One-Touch), combined with biometric authentication on the user’s phone. (If biometric authentication is not available, then any available/configured phone unlock mechanism on the user’s phone can be used instead.)
The idea is simple and the authentication flow can be described with the following steps:
Upon signing in, say in your web application, the user is prompted to enter his username. Alternatively, if the user has logged in before from the same browser, and in order to improve user experience, the browser can remember “returning” users and ask them to select their username by simply clicking on a button or a dropdown list, instead of having to type the full username every time.
Invoke Futurae authentication to securely authenticate the user. We recommend using One-Touch or Scan QR code. For One-Touch in particular, the flowchart of the previous section shows you the steps you need to implement using the Auth API in order to invoke One-Touch. Simply follow the path that contains
approve(aka One-Touch) as the authentication factor that you have to pass to /user/auth.The user will receive a push notification on his phone, and has to open the Futurae mobile app (or custom, Futurae-powered authenticator app) in order to approve/reject the authentication request. Upon tapping “Approve” the user needs to perform one extra verification step: Locally authenticate using the phone’s biometric (or any available/configured) authentication mechanism. This extra verification step adds a second authentication factor (the first factor being the possession of the phone itself), thus making the passwordless login experience not only user friendly but also secure, involving two authentication factors.
Mobile Only Authentication (Single Device)
When a user is logging in via a mobile browser or native application that exists on a mobile device which has the Futurae mobile app (or custom, Futurae-powered authenticator app) installed and enrolled for that particular user, then the user can be strongly and conveniently authenticated using the mobile only (or mobile auth) approach. In this particular case, the user is logging in from his trusted device (i.e., one that has the Futurae-powered authenticator app installed and enrolled), and in order to strongly authenticate the user, we just need to ensure that the login indeed originates from his trusted device.
Let’s assume that the user is attempting to log in on a mobile application, let’s just call it main app, on his trusted device. Let’s also assume that the application is using Futurae authentication. From a user’s perspective, mobile only authentication works as follows:
Initially the user is in the main app. When Futurae authentication takes place the main app will either automatically switch to the Futurae-powered authenticator app, or present the user with a button, which when the user taps on it, it will switch to the Futurae-powered authenticator app.
The user is now in the Futurae-powered authenticator app, where he is asked to approve/reject the authentication request.
Once the user approves/rejects the authentication request, he is automatically transferred back to the main app. Assuming that the user successfully approved the authentication attempt, the main app logs the user in.
In the above description there are two app switch actions happening:
- Switch from main app to the Futurae-powered authenticator app (either automatically or by the user tapping on a button), so that the user can approve the authentication attempt.
- Switch back from the Futurae-powered authenticator app to the main app (automatically) once authentication is completed, so that the user can continue using the main app.
On iOS, both switch actions happen via invoking app deep links. On Android, the main-to-futurae app switch happens via invoking an app deep link, but the futurae-to-main app switch happens implicitly via the Android’s back stack mechanism.
Futurae supports two type of app deep links that can be used to switch between apps: URI schemes and Universal/App Links. Due to their improved security and reliability, Futurae recommends using Universal/App Links whenever possible. For more information, please refer to Android App Links and iOS Universal Links.
The app deep links used for the main-to-futurae app switch are called mobile_auth_uri (used for URI scheme redirection) and mobile_auth_universal_link (used for Universal/App Link redirection) and they are provided by Futurae to your application via the Auth API. The app deep link used (on iOS only) for the futurae-to-main app switch is called mobile_auth_redirect_uri, and should be provided by your application to Futurae via the Auth API.
The flow below explains how to use the Auth API in order to realize mobile only authentication:
Call /user/preauth to check if the user is eligible for Futurae authentication, as well as retrieve his enrolled devices and the capabilities of each device (the capabilities of a device determine which factors can be used with that device).
Call /user/auth with “mobile_auth” as
factor. Pass themobile_auth_redirect_urias in input parameter to the request. The response, among other things, will contain themobile_auth_universal_linkandmobile_auth_uriattributes.Pass the
mobile_auth_universal_linkormobile_auth_urito the main app (page in mobile browser or native app). Create a button with the supplied app deep link as action, and prompt the user to tap on it in case he is on his mobile device with the Futurae-powered authenticator app installed. Alternatively, the main app can automatically call the app deep link to switch to the Futurae-powered authenticator app.Once the Futurae-powered authenticator app is triggered, it will ask the user to confirm the authentication request. After the authentication is completed, the Futurae-powered authenticator app will call the
mobile_auth_redirect_uriin order to switch back to the main app (only applicable to iOS, in Android the Futurae-powered authenticator app activity will finish and the back stack will pop the main app to the foreground).Once the main app is active in the foreground, it should check with the backend about the result of the authentication attempt and act accordingly. In the meantime, in the backend use the
session_id(retrieved by /user/auth) in order to query the status and eventually retrieve the result of this particular authentication attempt, via the /user/auth/status endpoint. Alternatively, you can supply a callback URL when invoking /user/auth. Futurae will call this URL with status updates and the result of the authentication attempt.